---
title: User banning
description: Implement a user banning feature using plugins
sidebar:
order: 70
---
## Overview
This tutorial shows you how to add a user banning feature to your SuperTokens authentication flows.
The guide makes use of the plugins functionality which provides the ability to ban/unban users.
## How it works
The plugin makes use of the `UserRoles` feature to keep track of banned users.
When you ban someone, they get assigned a new role, `banned`, and their session gets revoked immediately.
Additionally, the default session validation logic gets overridden to prevent users with the banned role from accessing the application.
### Caching
To avoid extra network calls during session verification, the plugin uses an in-memory cache to keep track of the ban status.
The cache gets reloaded during the first session verification, after a server start, causing a slight increase in latency.
If you are working with a serverless environment or with distributed applications, you can implement your own caching strategy through overrides.
## Before you start
The user banning plugin supports only the `React` and `NodeJS` SDKs.
Support for other platforms is under active development.
Besides initializing the plugin, you also have to include the `UserRoles` recipe in your SuperTokens configuration.
## Steps
### 1. Initialize the backend plugin
#### 1.1 Install the plugin
```bash
npm install @supertokens-plugins/user-banning-nodejs
```
#### 1.2 Update your backend SDK configuration
```typescript
import SuperTokens from "supertokens-node";
import UserBanningPlugin from "@supertokens-plugins/user-banning-nodejs";
import UserRoles from "supertokens-node/recipe/userroles";
SuperTokens.init({
appInfo: {
appName: "My App",
apiDomain: "https://api.example.com",
},
recipeList: [
UserRoles.init(), // Required: UserRoles recipe must be initialized
// your other recipes
],
experimental: {
plugins: [
UserBanningPlugin.init({
userBanningPermission: "ban-user", // Optional: defaults to "ban-user"
bannedUserRole: "banned", // Optional: defaults to "banned"
}),
],
},
});
```
:::warning
Make sure to also initialize the `UserRoles` recipe if you haven't already.
:::
### 2. Initialize the frontend plugin
#### 2.1 Install the plugin
```bash
npm install @supertokens-plugins/user-banning-react
```
#### 2.2 Update your frontend SDK configuration
```typescript
import SuperTokens from "supertokens-auth-react";
import UserBanningPlugin from "@supertokens-plugins/user-banning-react";
SuperTokens.init({
appInfo: {
appName: "My App",
apiDomain: "https://api.example.com",
websiteDomain: "https://example.com",
},
recipeList: [
// your recipes
],
experimental: {
plugins: [
UserBanningPlugin.init({
userBanningPermission: "ban-user", // Should match backend config
bannedUserRole: "banned", // Should match backend config
onPermissionFailureRedirectPath: "/", // Optional: defaults to "/"
}),
],
},
});
```
### 3. Ban users
#### 3.1 Using the user banning interface
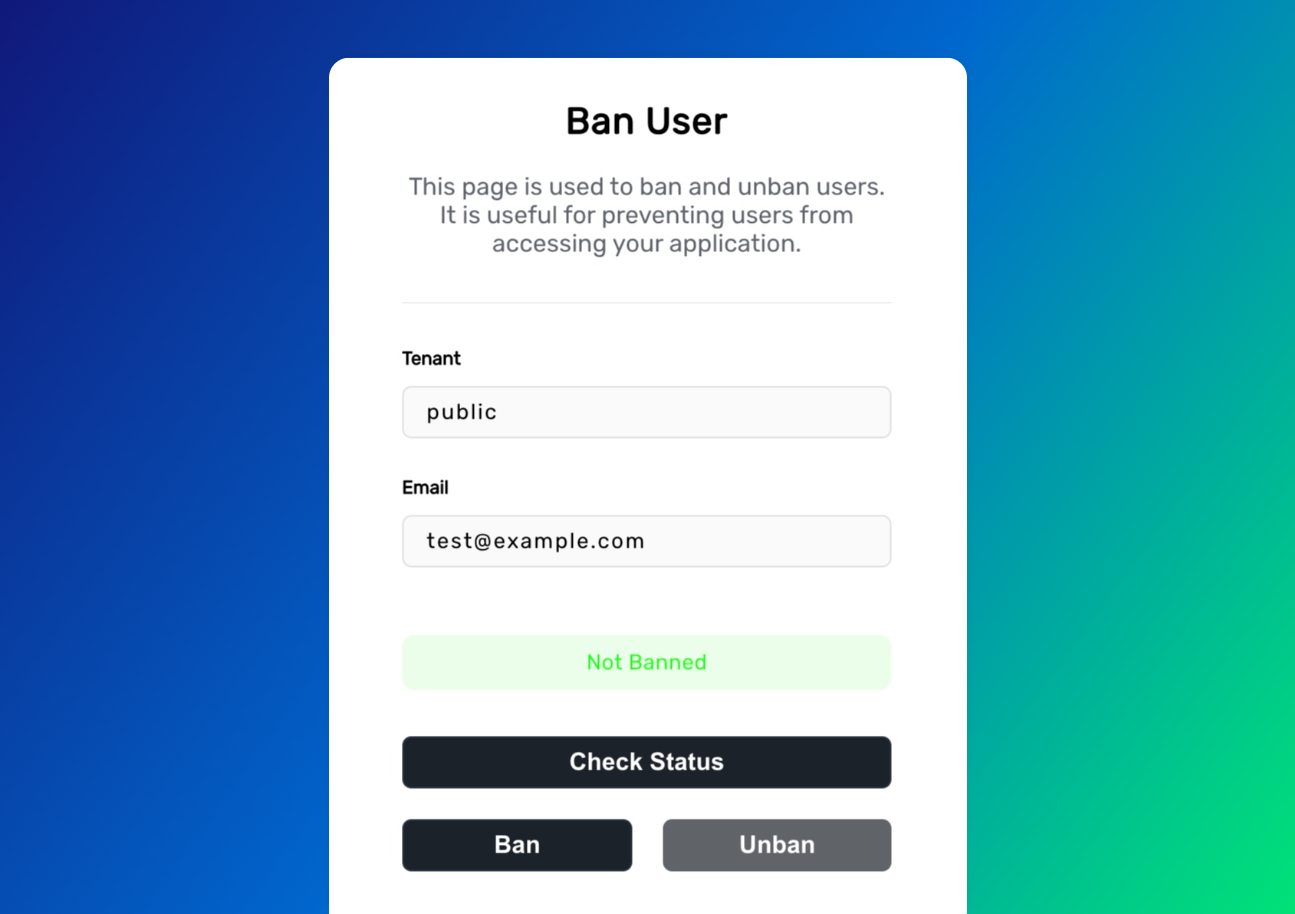
The plugin provides a complete administrative interface accessible at `/admin/ban-user`.
Before you access the interface, make sure that your user has the required permission, `ban-user` by default.
Read the [role management actions page](/additional-verification/user-roles/role-management-actions#add-permissions) for instructions on how to add permissions to your users.
From the interface you can check the banning status of a user.
Based on that status, you can either ban or remove the ban for that account.
#### 3.2 Using direct API calls
You can also manage user bans programmatically using the exposed API endpoints.
##### Ban/unban user
```javascript check=false reason="Requires surrounding async application context"
// Ban a user
const banResponse = await fetch("/plugin/supertokens-plugin-user-banning/ban?tenantId=public", {
method: "POST",
credentials: "include", // Include session cookies
headers: {
"Content-Type": "application/json",
},
body: JSON.stringify({
email: "user@example.com",
// You can also pass the userId instead of the email
// userId: "user123",
isBanned: true, // true to ban, false to remove ban
}),
});
const banResult = await banResponse.json();
if (banResult.status === "OK") {
console.log("User banned successfully");
} else {
console.error("Failed to ban user:", banResult.message);
}
// Remove ban from a user
const unbanResponse = await fetch("/plugin/supertokens-plugin-user-banning/ban?tenantId=public", {
method: "POST",
credentials: "include",
headers: {
"Content-Type": "application/json",
},
body: JSON.stringify({
email: "user@example.com",
isBanned: false,
}),
});
```
##### Check ban status
```javascript check=false reason="Requires surrounding async application context"
// Check if a user is banned
const statusResponse = await fetch(
"/plugin/supertokens-plugin-user-banning/ban?tenantId=public&email=user@example.com",
{
method: "GET",
credentials: "include",
},
);
const status = await statusResponse.json();
if (status.status === "OK") {
console.log("User is banned:", status.banned);
} else {
console.error("Error checking ban status:", status.message);
}
```
## Customization
### Implement a custom user interface
To create a custom user interface you can use the `usePluginContext` hook.
It allows you to access the plugin's API methods and configuration in custom React components:
```tsx
import { usePluginContext } from "@supertokens-plugins/user-banning-react";
function MyCustomAdminComponent() {
const { api, pluginConfig, t } = usePluginContext();
const handleBanUser = async (email: string) => {
try {
const result = await api.updateBanStatus("public", email, true);
if (result.status === "OK") {
console.log("User banned successfully");
} else {
console.error("Failed to ban user:", result.message);
}
} catch (error) {
console.error("Error:", error);
}
};
const handleCheckBanStatus = async (email: string) => {
try {
const result = await api.getBanStatus("public", email);
if (result.status === "OK") {
console.log("User has ban:", result.banned);
} else {
console.error("Error:", result.message);
}
} catch (error) {
console.error("Error:", error);
}
};
return (
{t("PL_UB_BAN_PAGE_TITLE")}
);
}
```
## Next steps
Besides user banning you can also look into other user management features and security measures:
Prevent suspicious authentication attempts.
Implement role-based access control for your users.
General information on how plugins work.
 From the interface you can check the banning status of a user.
Based on that status, you can either ban or remove the ban for that account.
#### 3.2 Using direct API calls
You can also manage user bans programmatically using the exposed API endpoints.
##### Ban/unban user
```javascript check=false reason="Requires surrounding async application context"
// Ban a user
const banResponse = await fetch("/plugin/supertokens-plugin-user-banning/ban?tenantId=public", {
method: "POST",
credentials: "include", // Include session cookies
headers: {
"Content-Type": "application/json",
},
body: JSON.stringify({
email: "user@example.com",
// You can also pass the userId instead of the email
// userId: "user123",
isBanned: true, // true to ban, false to remove ban
}),
});
const banResult = await banResponse.json();
if (banResult.status === "OK") {
console.log("User banned successfully");
} else {
console.error("Failed to ban user:", banResult.message);
}
// Remove ban from a user
const unbanResponse = await fetch("/plugin/supertokens-plugin-user-banning/ban?tenantId=public", {
method: "POST",
credentials: "include",
headers: {
"Content-Type": "application/json",
},
body: JSON.stringify({
email: "user@example.com",
isBanned: false,
}),
});
```
##### Check ban status
```javascript check=false reason="Requires surrounding async application context"
// Check if a user is banned
const statusResponse = await fetch(
"/plugin/supertokens-plugin-user-banning/ban?tenantId=public&email=user@example.com",
{
method: "GET",
credentials: "include",
},
);
const status = await statusResponse.json();
if (status.status === "OK") {
console.log("User is banned:", status.banned);
} else {
console.error("Error checking ban status:", status.message);
}
```
## Customization
### Implement a custom user interface
To create a custom user interface you can use the `usePluginContext` hook.
It allows you to access the plugin's API methods and configuration in custom React components:
```tsx
import { usePluginContext } from "@supertokens-plugins/user-banning-react";
function MyCustomAdminComponent() {
const { api, pluginConfig, t } = usePluginContext();
const handleBanUser = async (email: string) => {
try {
const result = await api.updateBanStatus("public", email, true);
if (result.status === "OK") {
console.log("User banned successfully");
} else {
console.error("Failed to ban user:", result.message);
}
} catch (error) {
console.error("Error:", error);
}
};
const handleCheckBanStatus = async (email: string) => {
try {
const result = await api.getBanStatus("public", email);
if (result.status === "OK") {
console.log("User has ban:", result.banned);
} else {
console.error("Error:", result.message);
}
} catch (error) {
console.error("Error:", error);
}
};
return (
From the interface you can check the banning status of a user.
Based on that status, you can either ban or remove the ban for that account.
#### 3.2 Using direct API calls
You can also manage user bans programmatically using the exposed API endpoints.
##### Ban/unban user
```javascript check=false reason="Requires surrounding async application context"
// Ban a user
const banResponse = await fetch("/plugin/supertokens-plugin-user-banning/ban?tenantId=public", {
method: "POST",
credentials: "include", // Include session cookies
headers: {
"Content-Type": "application/json",
},
body: JSON.stringify({
email: "user@example.com",
// You can also pass the userId instead of the email
// userId: "user123",
isBanned: true, // true to ban, false to remove ban
}),
});
const banResult = await banResponse.json();
if (banResult.status === "OK") {
console.log("User banned successfully");
} else {
console.error("Failed to ban user:", banResult.message);
}
// Remove ban from a user
const unbanResponse = await fetch("/plugin/supertokens-plugin-user-banning/ban?tenantId=public", {
method: "POST",
credentials: "include",
headers: {
"Content-Type": "application/json",
},
body: JSON.stringify({
email: "user@example.com",
isBanned: false,
}),
});
```
##### Check ban status
```javascript check=false reason="Requires surrounding async application context"
// Check if a user is banned
const statusResponse = await fetch(
"/plugin/supertokens-plugin-user-banning/ban?tenantId=public&email=user@example.com",
{
method: "GET",
credentials: "include",
},
);
const status = await statusResponse.json();
if (status.status === "OK") {
console.log("User is banned:", status.banned);
} else {
console.error("Error checking ban status:", status.message);
}
```
## Customization
### Implement a custom user interface
To create a custom user interface you can use the `usePluginContext` hook.
It allows you to access the plugin's API methods and configuration in custom React components:
```tsx
import { usePluginContext } from "@supertokens-plugins/user-banning-react";
function MyCustomAdminComponent() {
const { api, pluginConfig, t } = usePluginContext();
const handleBanUser = async (email: string) => {
try {
const result = await api.updateBanStatus("public", email, true);
if (result.status === "OK") {
console.log("User banned successfully");
} else {
console.error("Failed to ban user:", result.message);
}
} catch (error) {
console.error("Error:", error);
}
};
const handleCheckBanStatus = async (email: string) => {
try {
const result = await api.getBanStatus("public", email);
if (result.status === "OK") {
console.log("User has ban:", result.banned);
} else {
console.error("Error:", result.message);
}
} catch (error) {
console.error("Error:", error);
}
};
return (